Showing posts with label WASC. Show all posts

Saturday, August 13, 2011

Strawberry Shortcake House

Here it is! The house of Strawberry Shortcake.  It is made of White Cake and Strawberry filling with a Vanilla Buttercream icing, all covered in Fondant. The best part of making this cake was when I bought a Strawberry Shortcake doll to sit on top, and opened the package to smell Strawberry Shortcake's hair- and it still smelled like strawberries- just like it did when I was a little girl!


The White Cake I made was modified from the recipe at Food.com. I also Quadrupled the recipe to make the 4 layer cake.

Ingredients:
1 C Sugar
1/4 C Butter
2 Eggs
1/2 C Sour Cream
3 tsp Vanilla Extract (I use homemade vanilla)
1 1/2 C Flour
1 3/4 tsp Baking Powder
1/2 C Milk (or Almond Milk, or water if milk is not available)

Instructions:
1) Blend sugar and butter until fluffy.
2) Add eggs, vanilla, Sour Cream and half of the milk.
3) Add in dry ingredients, mix until combined.

Mixture will be thick. If it does not pour well, add another 1/4 C of water or milk.
Bake in a preheated oven of 350 F (I bake at 340 in my oven because it runs a little hot).
Original recipe quantities will make a 9x9 cake. Quadrupling the recipe made 4 x 6" cakes.
Bake for 30+ minutes (time will vary depending on your pan size).

Saturday, June 4, 2011

Rose Cake with Vertical Layers

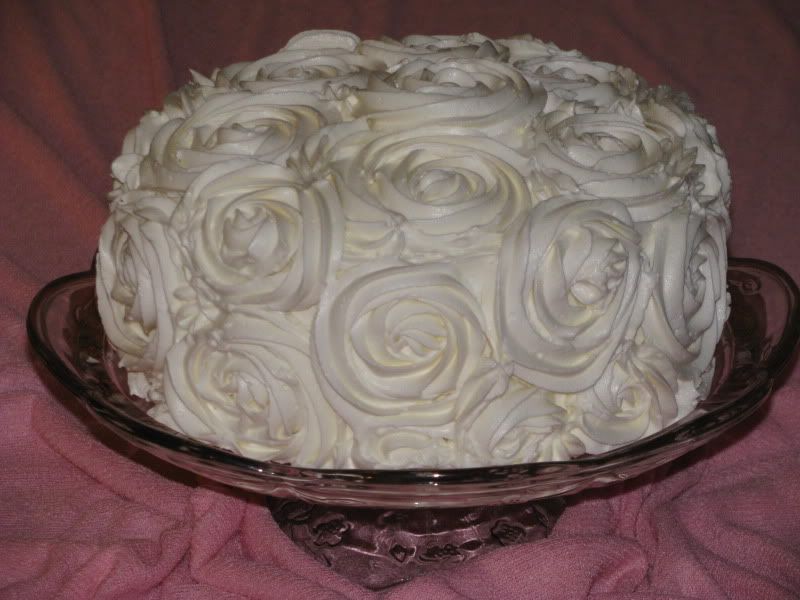
I wanted to make a simple but elegant cake for a coworker's baby shower luncheon and someone suggested the Rose Cake with Vertical Layers from the I am Baker blog- she is amazing and her cakes are inspirational! You should definitely check out her work- and her cake photos are gorgeous!

So I attempted her Rose Cake with Vertical Layers, and it was SO much fun to make!


I used a Red Velvet Cake and a White Almond Sour Cream Cake (WASC) for the vertical layers, and a crusting Vanilla Buttercream icing.

Although my pictures aren't very pretty- you get the idea of how this is done- it was pretty simple and a huge hit with the mommy-to-be, and my other coworkers :)

Without further ado- here are a couple of photos- a photo of the inside layers will be added soon.

These steps aren't complete- but you get the general idea of how to assemble the Vertical Layer cake.

1) Make two 2" 2-layer cakes (or just make two 3" or 4" cakes instead of making a multi-layer cake (I used Red Velvet and WASC flavors). If making a 2-layer cake, while the cakes are still hot, torte them and stick them together with the crumb-side facing each other (after drizzling simple syrup between the layers to help them stick together).  Stick the cakes in the freezer for at least 5-6 hours.

2) Take a cardboard round the size of your cakes and draw symmetrical circles on the cardboard- basically like a replica of a dart board. Keep the cardboard round in tact.

3) Cut each cake using the outer circle first- as you see in the photo below each circle cut into the cake is the same distance as the other cake.  Once the first circle has been cut, take the cardboard round and cut the outside layer off- which will make a smaller circle. Use that circle to make identical cuts on the cakes again. Then cut the cardboard round one more time, then put the smaller cardboard round back on the cake to make additional identical cuts in the cakes- do this until you have used all of the rounds (this is starting to confuse me- if you have questions about how it is done, I'll email you more specific directions- or you can check out I Am Baker's blog- did I mention she's amazing?!)


4) Next disassemble each of the layers of both cakes. Take the center of the Red Velvet cake, and wrap the next-sized layer of the WASC around the core of the Red Velvet. Then take the next-sized layer of the Red Velvet, and wrap it around the WASC. Do this until you don't have any other layers to wrap around each other. This will make two cakes with reverse-layers like you see in the photo below.

5) Next put a simple syrup on the layers, wrap them in wax-paper, then tie it with a piece of towel or soft material, and freeze for about 2 hours. Don't add too much simple syrup, just add enough to help the layers stick together.

 6) Allow the cake to thaw to avoid it's production of condensation under the crusting buttercream frosting. Put on a crumb coat so the cake can no longer be seen. Allow the crumb coated cake to sit for about 15 minutes before decorating.

7) Next cover the cake with piped-roses. Start with a 1M large star tip, and make the roses the size of a cupcake. I started on the top of the cake and worked over the edges then down the sides of the cake. When you find a gap, you can just make a "swoosh" of icing that follows the curve of the rose.


Below is a photo of the Vertical Layers. The party guests cut into it before I could get a good picture, so this is the carnage that followed the initial cutting of the cake. Next time I make this I'll take additional photos!


I used the following crusting buttercream recipe, and it was very yummy- not too sweet, but it crusted very well.

Crusting Buttercream Ingredients:
1 cup butter, unsalted
1 cup vegetable shortening
8 cups powdered sugar (confectioner's sugar)
3/4 cup heavy cream
3 teaspoons vanilla extract
1/4 teaspoon salt

Instructions:
- In a stand mixer (you can use a hand mixer, but stand mixer is preferred), blend together the butter, shortening and salt.
- Slowly mix in the powdered sugar, whipping cream and vanilla extract.
- Once the ingredients have been combined, mix on high for 5-10 minutes until the frosting is well beaten, light and fluffy.
- You can add different flavored extracts if you do not want to use vanilla- Almond is a popular flavor, or an Almond-Vanilla combo.

Thursday, April 28, 2011

Who lives in a pineapple under the sea?!

Why, Spongebob Squarepants of course! Here is a WASC with strawberry filling and a vanilla buttercream icing covered in fondant that resembles our favorite sea sponge.


Thursday, December 23, 2010

R2-D2 Groom's Cake (and a Wedding Cake)

I was recently asked by a couple of dear friends to create a wedding cake and a grooms cake- I was so thrilled and honored to be asked to do make these cakes!  The Wedding cake was a funfetti (top tier & bottom tier) and white cake (middle tier) with buttercream frosting and bavarian cream filling, and fondant covering. 

The Grooms cake was a surprise- R2-D2 for the Star Wars lover! It was a Chocolate WASC cake filled with chocolate mousse and iced with chocolate buttercream, then topped with fondant.  The accents were painted on, and the feet and legs were pure fondant.

Saturday, June 19, 2010

Baby Grand Piano Cake

My cousin Chuck graduated from high school last week! He is going to school to be a pastor!  He has an AMAZING gift to play and compose the piano, so for his graduation I wanted to do something special. I made him his very own baby grand. Now, it didn't last the night, but it was pretty yummy :)

The cake was a Chocolate WASC with Vanilla Buttercream frosting and Bavarian Cream Filling. The cake is covered with Black Fondant and is on a cake stand that my husband made after I carved the cake.   Here are the pictures showing how I made the cake:

The pictures below are of the following points in the process.
1) Newly carved cake- no icing.
2) Bavarian Cream filling.
3) Crumb coating on the cake.
4) Fondant covered cake.
5) Almost done! Accent pieces placed on cake, ready for transport.
6) The final cake- ready to be cut into.

Monday, June 7, 2010

Tank Cake

My aunt asked me to make a military themed birthday cake for my cousin. It turns out he likes tanks- so I got a tank in my brain and started carving away at the cake. I was super excited to make this cake because it is my first real carved cake! So here it is- let me know your thoughts!

I used my typical WASC cake recipe using yellow boxed cake this time, then added a little marble-twist.  I saved about 4 Cups of the yellow cake batter and added about 3/4-1 C of cocoa powder. Mix the batter and cocoa really well, then drop on the cake in rows.  Once the chocolate batter is striping the yellow batter, I took a silicone spatula and ran it through to get a marbling effect through the whole depth of the cake. (This is the pre-cooked marble cake).


Once all layers were baked, I leveled each cake, then I froze them overnight (makes it easier to carve!).  The Tank was composed of 2x 2-layer cakes.

The filling was a Vanilla Cream Cheese Mousse (without the vanilla beans) that was colored Army-man green.

The icing was an Vanilla Almond Buttercream (I used this recipe, but used half-almond, half-vanilla extract. I used the paper towel method to smooth the icing on the tiers.

 The final product was accented by black fondant strips to look like treads and gears. The gun barrel was created using a pretzel rod covered in buttercream, and tipped with a black fondant gun barrel.

Monday, October 26, 2009

Vanilla Butternut Sour Cream Cake


Within the next week I will begin a new chapter of my life. I am leaving my 20s and entering a new decade of life- yup, you guessed it- I'm turning 30!  In honor of this wonderful event, I have decided to make my own birthday cake. Although most people think I'm crazy for wanting to make my own cake, I want to explain my madness here :)

My birthday falls 2 days after the annual event- Halloween. For as long as I can recall, my birthday has been closely associated with this fun-filled day.  This year my parents helping me celebrate my 30th birthday part with my family's annual Halloween party (for old time's sake).  At this festive event every family member typically brings some Halloween-themed goodie to be shared with many. My recent enjoyment of cake making and decorating experimentation inspired me to make my own cake.

The next week will document my attempt at decorating a simple round cake with a graveyard scene.  This post gives you a look at the first part of the project- the unfinished and unchanged round cake layers.

This particular recipe is extremely easy to make, and provides a firm cake that is great for carving or layering to make wedding, birthday and other shaped cakes.

Recipe:
2 boxes of White cake (any type- I buy whatever is the least expensive)
2 C granulated Sugar
1 C all-purpose Flour
1 tsp Salt
8 Egg Whites
2 1/2 C Water
4 Tbsp Vegetable Oil
2 tsp Vanilla Extract (I use homemade Vanilla beans soaked with Vodka, but store-bought is fine)
6-8 drops Vanilla Butternut Concentrated Extract (*If you use regular extract, use 2 tsp- try different flavors like Almond, Butter, etc.)
16 oz Sour Cream OR 12 oz whipped Cream Cheese

*Pre-heat oven to 325 degrees Fareneheit
**This recipe can be easily halved

Instructions:
1) Mix all dry ingredients (Cake mixes, flour, sugar, salt).
2) Mix in the dry ingredients (Egg whites, water, vegetable oil, extracts and sour cream / cream cheese).
3) Mix by hand or with a hand mixer until the lumps of dry ingredients are out of the mixture.
4) Grease pans with shortening or cake release (I prefer cake release).
5) Baking time will vary depending on the size of the cake pan used. This recipe typically makes any of the following sizes:
    • One 16" round cake
    • One 14" round cake + One 6" round cake
    • One 12" round cake + One 10" round cake
    • One 10" round cake + One 8" round cake + One 6" round cake
    • One 12"x18" sheet cake
I've found that baking times typically follow this pattern (give or take a few minutes).
    • 6" = 20 minutes
    • 8" = 25 minutes
    • 10" = 35 minutes
    • 12" = 40 minutes
    • 14" = 45 minutes
    • 16" = 50 minutes
I would suggest adding 5 minutes if the middle of the cake seems to wiggle as you begin to move the oven rack that supports the cake. You can also check the cake's completeness by inserting a clean toothpick into the center of the cake. If the cake is not yet done but the outer layer is darkening too quickly, you can place tin foil over the top or move the cake to the bottom rack.


This recipe was adapted from the White Almond Sour Cream Cake from CakeCentral.com